
A great piece of application software is Apache. It is the most extensively used Web server program worldwide. Apache is the most popular Web server application for Unix-like operating systems, even though it can be used on almost all platforms, like Windows and Linux. The name of the Native American tribe known as the Apache, which was skilled in fighting and strategic thinking, served as the inspiration for the word “Apache”.
At certain times, you need to quickly deploy a web server. Implementing a proof-of-concept project, testing web apps, or simply becoming comfortable with web programming are all made simple with a web server. The below steps will show you how to deploy an Apache web server on your machine.
Install Apache in Ubuntu
Apache can be found in the default Ubuntu repositories. So, installing is easy when you use the apt package manager. You can do it as a user or a root user. Here, we will guide you on how to do it as a user other than root.
- Run this command in your terminal to update the local package index:
sudo apt update - Install the apache2 package and its dependencies:
sudo apt install apache2 -y- Make sure your firewall is set up to accept queries on port 80. In order to determine whether or not your firewall is set up to permit Apache traffic, you may run the following command:
sudo ufw app list
As the report shows, Apache supports three different configurations.
- Apache: Opens just port 80 in this profile.
- Apache Full: This profile allows both regular HTTP (port 80) and encrypted TLS/SSL (port 443) communication.
- Apache Secure: Only port 443 (for HTTPS/SSL) is allowed using this configuration.
It is suggested that you choose the strictest profile that still allows the preset traffic. The only port we need to open is 80, since we haven’t set up SSL for our server yet in this tutorial.
sudo ufw allow 'Apache'- You may check that the modification took effect by entering and list of allowed HTTP traffic:
sudo ufw status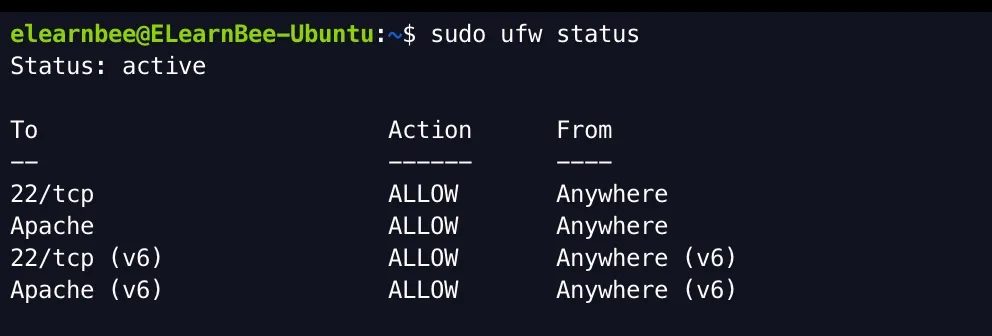
The result reveals that the profile has been enabled to permit access to the Apache web server. This may now be seen by users.
- Use the following command to check if the service is running:
sudo systemctl status apache2
Note: When the service is running, you will see that it is “active”. From the above output, it looks like the service started up fine. The best way to test this, though, is to ask Apache for a page. You can use your IP address to check that the software is running correctly by going to the default Apache landing page. You can get your server’s IP address in a few different ways from the command line if you don’t know it.
hostname -I- There are two options to check your apache server. Use the IP address from the output of the previous command and use curl or paste the IP address on the browser to load the Apache server. Using the curl we will get the following output:
curl 192.168.0.184Note: In your case, the IP address 192.168.0.184 will be different. Use the one from the output of command “$ hostname -I “. Now, you can see the output of the HTML file of your Apache web page.

Copy and paste the IP address on your browser and hit enter.

If the default Apache web page loads successfully, then the server is functioning properly. Congratulations!
